Apps used for this tutorial: Camera+, Filterstorm (though any blender app will work)
Double exposures are a lot of fun and are really quite simple once you figure out what kind of double exposure you'd like to do. I enjoy adding two images that compliment each other and hopefully create the sense that there is a story there. Most times my inspiration comes from life events that I try to mirror in the works but there are times that I blend images that are simply appealing to me. Below I will describe my process in stages. I begin by focusing on the part that was the most difficult for me at first, figuring out how to take photos and blend them without distracting background elements and colors and finding two images that work well together. In this tutorial I will also explain how to simply blend those images together. I will follow up in the future with more advanced editing techniques for removing distracting elements and achieving the desired look with relatively simple ease. I hope you find this helpful and as much fun as I do.
Step 1 - The Photos
- Exposure 1

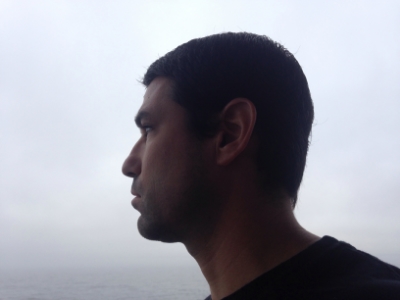
So much of my process depends on the original photo so I'm going to spend some time describing how I found success with this process and it all started in November, 2013 with the photo above.
The above photo is unedited and taken with my iPhone5 and the Camera+ app (great for it's superb exposure control). Notice there are no distracting elements in the background, the subject is approximately 80% silhouetted with light highlighting her facial features. This setting is key in creating interesting double exposures without complicated editing (we'll get to that in later tutorials).
I have found that foggy or rainy days are best as the natural light is not too harsh and any distracting elements in the background such as colors and clouds are usually obscured. Choose a spot such as a window or front porch at a location with nothing in the background. The overhead shelter provides the camera the opportunity to fix the exposure on the light, silhouette the figure and let you adjust as necessary to get the desired result. The same effect can be achieved by windows or studio lighting.
Below is another example of a photo I have used before you might recognize if you're familiar with my work. This photo was taken on a foggy day on the St. Johns River under an overhang on a dock.
Taking these elements into consideration you will find great ease in the following steps. I'll say that 90% of the double exposure success and ease is dependent upon the photos you're working with (that can be argued for any technique though mobile photography makes hiding mistakes easy with so many apps to work with so there are other ways).
- Exposure 2
For the second exposure you're going to want to pick something that will work well with the first exposure. For the second exposure I used a tree that I took moments after the first exposure. Please note you'll find better ease and success with photos taken on the same location so the backgrounds are the same and don't distort though you definitely aren't limited to this.
Step 2 - The Edit (Blending the Images)
Now that we have our two images the rest is simple
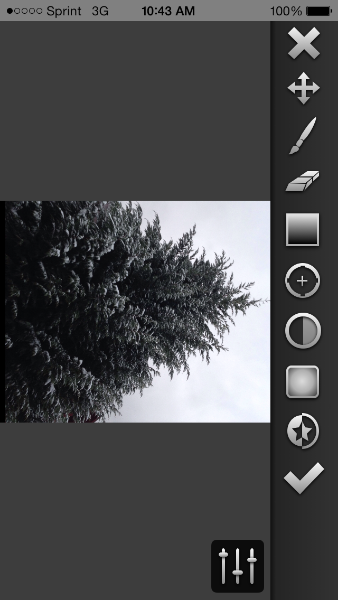
1. Open Exposure 1 in Filterstorm

2. Select the Layers setting and add a layer selecting the second image from your Camera Roll and align as desired as seen above.
3. Select Mask in the lower right hand corner
4. Select Invert Mask (the circle with the star in it, second to last item on the main menu above the Check Mark.
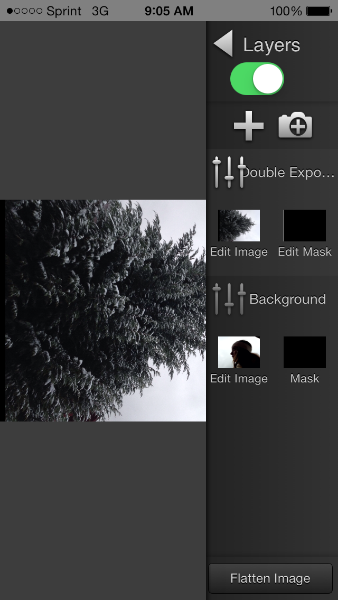
5. Select Layers - at this point you should see the above screen with only Exposure 2 showing.
6. Select Double Exposure

7. Select Screen from the Blend Modes Option

You should now see Exposure 1 and Exposure 2 layered and blended together. You can adjust the Opacity but I left it at 100% above.
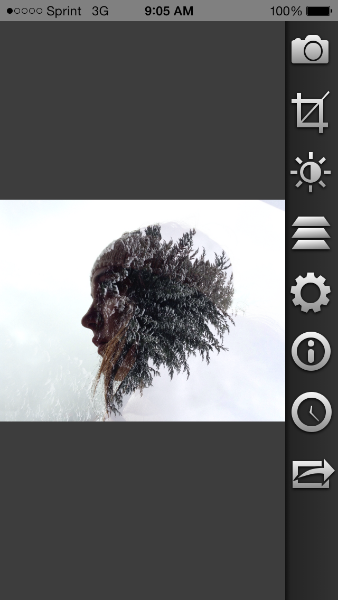
8. Now you are finished with Double Exposure - Simple Steps
I hope this tutorial has been helpful, I will be adding more advanced Double Exposure tips and techniques on how to expand the edits and accentuate portions of the image.